Ahh, yeah, I stand corrected. Sleeves were gone from the Thinkpads earlier than I thought.
- 5 Posts
- 19 Comments
Joined 1 year ago
Cake day: February 15th, 2024
You are not logged in. If you use a Fediverse account that is able to follow users, you can follow this user.
This is a good suggestion. That generation of ThinkPad keyboards wasn’t the No-travel scissor switch nonsense that most laptop keyboards now anyway. It was IBM buckling sleeve technology, and a low profile tactile switch with similarly low-pro keys would probably be about the closest thing to its feel.

For the very basics of KiCAD, their own intro is helpful. I had to wrap my head around the workflow: first schematic, then PCB.
Once you grasp that, some keyboard specific stuff is described by Joe Scotto in this video. He tends to rush his tutorials though, so best to go through the KiCad page first or revisit the video after.
For resources, I found Ai03’s library of footprints to be perfect, except that his vertical 2U were not oriented how I needed them, which I realized too late, LOL. Then, the kbplacer plugin by adamws was absolutely invaluable and saved me so much time. I used JLCPCB, because even when US-China tariffs were at their worst (and goodness knows they could be again if Trump gets a hangnail or something), JLC was still the cheapest option for me.
If you’ve never done a PCB before, I might humbly suggest keeping to a fixed layout for the first go-round. I did that on my first board and it worked perfectly for what I intended it to be. I got a little ambitious with this one, and ambition+inexperience+impatience led to a flawed project.
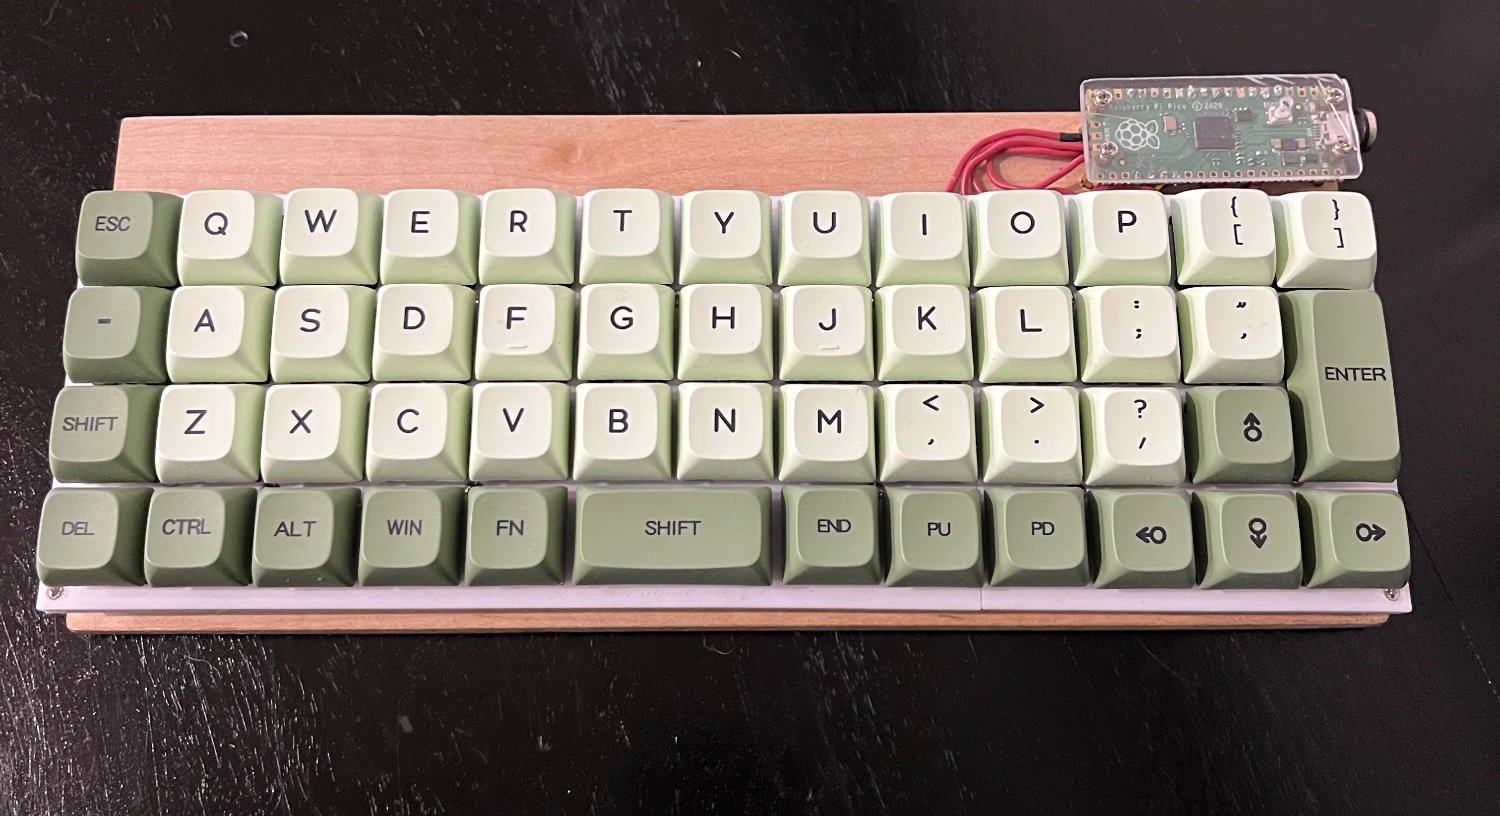
SKCM white. Both switches and keycaps (and the front feet, actually) came from a fried early-90s Focus keyboard that had a trackball where the arrow keys go, and the arrows were around it on mouse micro switches with little flappy “buttons” that are part of the case, also very mouse-like.
For the PCB, lots of YouTube and searching Geekhack, deskthority, and (yes) Reddit to see how to use KiCAD for mechanical keyboards. Mine uses the “cheat” of mounting a Raspberry Pi Pico clone to the underside so I don’t have to know as much about electronics (that part actually went perfectly).
The mistakes were two tiny bits of trace that got deleted but I didn’t see, and some placement issues for the Alps version that I had to work around. I have four of them left, so I’ll just use MX compatible switches and a normal sized spacebar for future builds and avoid the worst of it.
Thanks! I am going to keep those all in my back pocket for when the honeymoon of not having a $99 “box o’ parts” Voxelab wears off, though I feel a little guilty for never installing that BLTouch clone now.
I haven’t printed much with the Sovol yet. So far, the main things I’m running into are bed adhesion (the old standby of a washable glue stick is helping), and I’ve had a couple of vertically oriented parts get knocked off the bed, and slowing down quite a bit helped.

I know the beds are worse, apparently almost all of them. Sovol chose to change the Voron reference design to be cheaper and it’s just not held down right, so they exhibit varying degrees of “taco” inconsistency that the diagram accentuates visually. Mine has a corner that seems to be about 0.4mm too high, and the rest is a bit wavy to lesser amounts. This is the main reason I set it to redo its z offsets before every print.
The Sovol doesn’t use standard extrusion profiles so it’s less moddable, its hot end is not completely standard, and it uses injection molded parts in places the Voron uses 3d printed parts (that last may be be an advantage, lol). The Sovol also doesn’t run a completely clean version of Klipper. I think it’s set in a way to make it work a little better with their cheaper BOM.
It’s big and fast and Voron-like, but it’s just not a hand crafted super printer like a Voron can be.
I just got a Sovol SV08, which is like a Voron but changed up a bit so the teacher doesn’t get mad… and to be cheaper :-)
I’m just coming in from an Ender3 clone, but overall, other than the potential of taco bed messing up some prints, I’ve been really pleased with it. I’m still fine tuning what it likes to do, including slowing it down on some small vertical prints, letting the bed “heat soak” for a while to even out, and running the Z Offset calibration on every print, but Core XY, auto leveling, and all the other little QoL advantages are nice, and I’ve already used the big bed to print stuff that wouldn’t fit on a “normal” bed.
For your specific printer, Vorons are generally even more kit built than most printers, sometimes even completely assembled from a BOM by the builder/user. If they did it well, and if it loks to be in good shape, it should be an excellent and well supported printer. I paid USD490 for “We have Voron at home” and I feel like it was a good deal. I’m not super well versed in pricing in Europe, but EUR770 seems like a good deal on a kit, a REALLY good deal on a new 350mm, and a very solid one for a used printer in good shape.
Now, all that said, I am super glad that I kinda had some experience with more primitive printers before I got the Sovol. I’m less panicky about little inconveniences and realities of printing (especially on a budget), and I feel like I at some high level understand how it’s all supposed to be working and that I can look up how to fix things and implement what I learn. If you don’t want to deal with any of that, a Bambu, even with its potential walled garden “sword of Damocles”, might be a simpler idea.I understand they really are just super easy to live with.
 5·15 days ago
I just wiped Bazzite in favor of Tuxedo OS. I liked Bazzite a lot until I wanted to do the faintest wisp of development (setting up a new DIY keyboard with QMK). At that point I realized I’m in a very specific doughnut hole where I will occasionally want to do things that are still not mindlessly simple on an immutable distro, but I’m still untutored enough to need the walkthroughs that never include how to properly layer or sandbox stuff without just fucking up the very immutability that made it a good idea in the first place.
Shame though, as it was dead easy to install and use for basic productivity and especially games. A person with different needs and/or more skill would do very well with it. In the meantime, Tuxedo seems like a good snap-free Kubuntu alternative, and I’ve been floating around in KDE-running Debian derivatives (off and on) for decades.
it would make a good excuse to skip the trip and stay home like I wanted to do in the first place.
This, LOL. My credulity is inversely proportional to how badly I want to go on this trip.
maybe a bead from a dessicant packet? They’re usually more clear, but can sometimes drift towards brown.
One of my friends had one and they always did the same. I don’t think any computer has ever seen its power intentionally turned off as often as the Commodore 128.
First one I used was an Apple II at school. First I used outside of school was my buddy’s Laser Apple II clone. First one I owned was an Atari XEGS, with the caveat that we didn’t get the disk drive, so all programs had to be typed in when I wasn’t playing Bug Zapper or Missile Command or failing to learn how to play Flight Simulator 2. Still learned a lot of Atari BASIC.
Eventually we got a Tandy RSX with DOS 5.0 and “Tandy Deskmate”
 2·16 days ago
What you get with a lot of cheap gamer brands is a steel plate, tray mount, poor remapping options, and so-so switches.
So still like a million times better than whatever garbage came with your PC. I have an “E-Yooso” I still plug in sometimes. I changed the switches using “narrow 3-pin” outemus, changed the keycaps, and I actually remapped a key or two with Redragon software. It’s… nice. I don’t know what else to say.
That said, Keychron’s dived into the superbudget space with QMK enabled Lemokeys (no hot swap though), and their C and V stuff is also findable as open box in the same price range as these, so you’re probably better off going with them.
Wow, that guy is not fuckin’ around. The ergo community tends to be super minimalist.
As an aside, kbd.news is always a fun site, even if their standards can be very low sometimes. LOLOL.
Dagwood’s got a pretty nice table saw, though Mrs. Mullican needs to use the fence and a fuckin push-stick.

The very specific combination might not have been done, but full size PCBs are out there, especially as replacements for vintage boards. If you don’t mind ISO and only a row of LEDs rather than per-key, there’s THIS, which seems to have Bluetooth. They seem to have made some interesting choices with the numpad as well, which is for the most part NOT electrically distinct from the numrow.
There’s also this collection, which might send you in the right direction. If you can do some coding in QMK/ZMK, you might be able to make one of the BLE enabled Pro Micro clones work.

For anyone with a sewer system built for TP, this is an ideal workflow. Poops and poopers are not identical, and bidets are not magical. Trust but verify, friends.
 1·1 year ago
Rober’s always seemed a little off to me, like one of those who enjoys being famous more than the stuff that made him famous in the first place. Seems like he’s gotten worse, though. For instance, this video declares it “was not sponsored [by Zipline] in anyway nor did they pay for any of my travel or accommodations,” despite extolling their virtues over and over again by name, and lingering lovingly on their drones and logos like Michael Bay with a car company’s badge.
Smarter Everyday is also rather polished, and he’s even more in bed with the military industrial complex, but (as of a few months ago anyway) he comes off like he’s still actually enjoying the projects themselves and the information he’s sharing. It’s hard to exactly articulate the point where a content creator loses me, but I can feel it in my nerd-bones.
Okay… maybe one king…